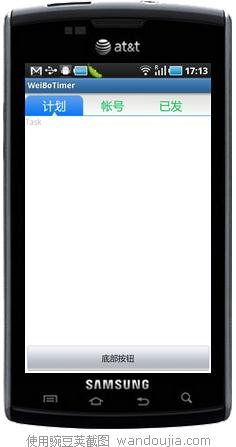
TabHost如果要自定义显示的效果,有点麻烦,而默认的样式有时候又与我们程序的风格不匹配.今天我们就用RelativeLayout来实现与TabHost相同的功能.上效果图:  点击上面的tab,tab自身样式会改变,下面内容也会改变,功能完全与TabHost相同. 介绍一下RelativeLayout,RelativeLayout是相对布局,顾名思义,就是说里面的控件位置都是相对其他控件的位置而确定的.如上面的效果,Tab相对于屏幕顶部对齐,底部按钮相对于屏幕底部对齐.而内容则放在顶部的Tab和底部的按钮中间. 所以所有被其他控件依赖定位的控件,必须先写,也就是说,要实现上面的效果,XML中不是从上往下写,而是先定上和下,再写中间,因为中间的内容高度,位置都依赖于它的上下控件. 实现TabHost效果的原理也简单,点击tab时设置被点击和没被点击的的tab的背景,字体颜色即可显示点击效果.在点击事件中,用View的removeAllViews()方法清除中间控件的所有内容,再用addView方法添加需要的内容. 下面上代码,布局XML:
<?xml version="1.0" encoding="utf-8"?>
<RelativeLayout xmlns:android="http://schemas.android.com/apk/res/android"
    android:layout_width="fill_parent" android:layout_height="fill_parent"
    android:weightSum="1" android:background="@color/white">
    <LinearLayout android:id="@+id/topmenu"
        android:orientation="horizontal" android:layout_alignParentTop="true"
        android:layout_width="fill_parent" android:layout_height="40dip"
        android:background="@drawable/topback" android:gravity="bottom">
        <!-- android:layout_alignParentTop 与父元素顶部是否对齐,这里true,就是把这个topmenu放屏幕顶部 -->
        <LinearLayout android:id="@+id/task" android:orientation="horizontal"
            android:layout_height="35dip" android:layout_width="100dip"
            android:background="@drawable/textback">
            <TextView android:layout_width="fill_parent" android:id="@+id/taskText"
                android:layout_height="fill_parent" android:text="计划"
                android:gravity="center" android:textSize="20sp" android:textColor="@color/white" />
        </LinearLayout>
        <LinearLayout android:id="@+id/accounts"
            android:orientation="horizontal" android:layout_height="35dip"
            android:layout_width="100dip">
            <TextView android:layout_width="fill_parent" android:id="@+id/accountsText"
                android:layout_height="fill_parent" android:text="帐号"
                android:gravity="center" android:textSize="20sp" android:textColor="@color/green"
                 />
        </LinearLayout>
        <LinearLayout android:id="@+id/sended"
            android:orientation="horizontal" android:layout_height="35dip"
            android:layout_width="100dip">
            <TextView android:layout_width="fill_parent" android:id="@+id/sendedText"
                android:layout_height="fill_parent" android:text="已发"
                android:gravity="center" android:textSize="20sp" android:textColor="@color/green" />
        </LinearLayout>
    </LinearLayout>


    <Button android:id="@+id/button"
        android:layout_alignParentBottom="true" android:layout_width="fill_parent"
        android:layout_height="wrap_content" android:text="底部按钮" />
        <!-- layout_alignParentBottom 与父元素底部是否对齐,这里true,就是把这个Button放屏幕底部 -->

<!-- RelativeLayout必须先写四周的控件,再写中间的,这里先写顶部的Tab和底部的Button,再写中间的Content,因为中间的内容位置是不固定的 -->
    <LinearLayout android:id="@+id/content"
        android:orientation="vertical" android:layout_width="fill_parent"
        android:layout_height="fill_parent" android:layout_below="@id/topmenu"
        android:layout_above="@id/button"></LinearLayout>
        <!-- layout_below,当前控件放在设定控件下方 .
            android:layout_above 当前控件放在设定控件上方
            这里配合使用,就是放在顶部tab和底部Button的中间
        -->

</RelativeLayout>
程序代码:
package com.pocketdigi;

import android.app.Activity;
import android.os.Bundle;
import android.view.LayoutInflater;
import android.view.View;
import android.view.View.OnClickListener;
import android.widget.LinearLayout;
import android.widget.TextView;

public class Main extends Activity {
    /** Called when the activity is first created. */
    LinearLayout task, accounts, sended, content;
    TextView taskText, accountsText, sendedText;

    @Override
    public void onCreate(Bundle savedInstanceState) {
        super.onCreate(savedInstanceState);
        setContentView(R.layout.main);
        task = (LinearLayout) findViewById(R.id.task);
        accounts = (LinearLayout) findViewById(R.id.accounts);
        sended = (LinearLayout) findViewById(R.id.sended);
        content = (LinearLayout) findViewById(R.id.content);

        taskText = (TextView) findViewById(R.id.taskText);
        accountsText = (TextView) findViewById(R.id.accountsText);
        sendedText = (TextView) findViewById(R.id.sendedText);

        LayoutInflater factory = LayoutInflater.from(this);
        View taskView = factory.inflate(R.layout.task, null);
        View accountsView = factory.inflate(R.layout.accounts, null);
        View sendedView = factory.inflate(R.layout.sended, null);
        //把三个内容视图的XML文件转化成View

        content.addView(taskView);
        //启动时默认载入taskView

        task.setOnClickListener(new TabListener(task, taskText, taskView));
        accounts.setOnClickListener(new TabListener(accounts, accountsText,
                accountsView));
        sended.setOnClickListener(new TabListener(sended, sendedText,
                sendedView));
        //设置三个tab的点击监听器

    }

    class TabListener implements OnClickListener {
        LinearLayout layout;
        TextView tv;
        View subView;

        TabListener(LinearLayout layout, TextView tv, View subView) {
            this.layout = layout;
            this.tv = tv;
            this.subView = subView;
        }

        @Override
        public void onClick(View v) {
            // TODO Auto-generated method stub
            task.setBackgroundDrawable(null);
            accounts.setBackgroundDrawable(null);
            sended.setBackgroundDrawable(null);
            taskText.setTextColor(getResources().getColor(R.color.green));
            accountsText.setTextColor(getResources().getColor(R.color.green));
            sendedText.setTextColor(getResources().getColor(R.color.green));
            // 全部设为未选中状态

            layout.setBackgroundResource(R.drawable.textback);
            tv.setTextColor(getResources().getColor(R.color.white));
            // 设置选中项

            content.removeAllViews();
            //移除所有内容
            content.addView(subView);
            //添加传入的View

        }

    }
}
Strings.xml中存两个颜色值:
    <color name="white">#ffffff</color>
    <color name="green">#0cc054</color>
三个内容视图的xml,只贴一个,另两个一样,名字不同而已: task.xml:
<?xml version="1.0" encoding="utf-8"?>
<TextView
  xmlns:android="http://schemas.android.com/apk/res/android"
  android:layout_width="fill_parent"
  android:layout_height="fill_parent"
  android:text="Task"
  >
</TextView>